Installing custom wainscoting is one of the most rewarding and value-boosting DIY finish carpentry projects you can undertake. When executed with precision carpentry techniques—accurate laser datum lines, symmetrical panel math, coped corner joinery, and furniture-grade paint prep—wainscoting transforms a plain drywall box into a bespoke architectural showpiece.
In this comprehensive installation manual written from decades of high-end residential trim carpentry experience, we walk through the exact sequential 8-phase protocol used by licensed finish carpenters.
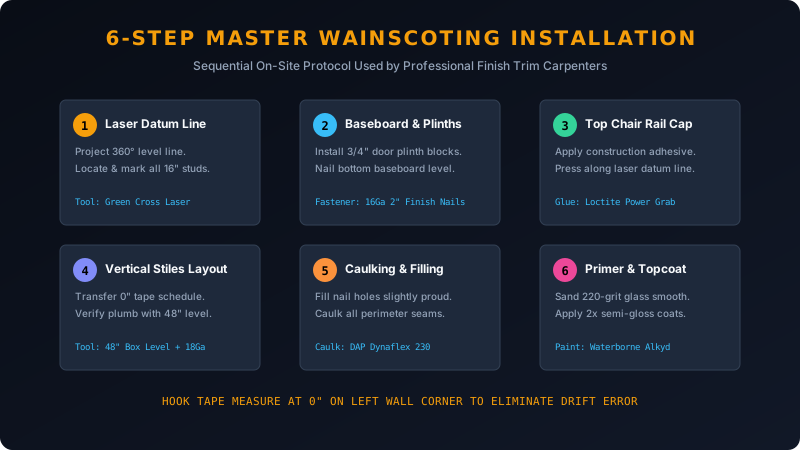
Phase 1: Tool Kit & Fastener Specifications
Before cutting your first piece of trim moulding, assemble the contractor-grade tools and consumables required for clean, split-free millwork:
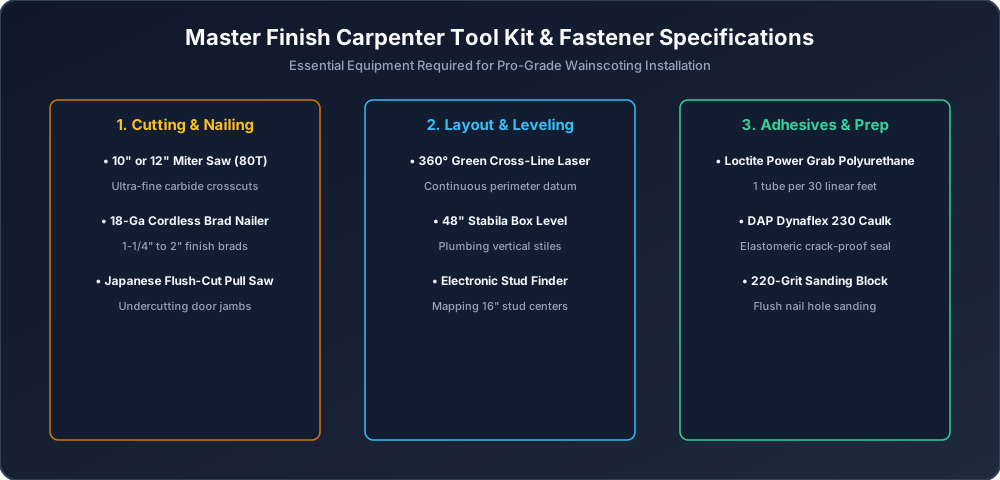
Essential Power Tools & Hand Tools:
- 10” or 12” Compound Miter Saw fitted with a high-density 80-tooth carbide fine-finish crosscut blade (Freud Diablo or equivalent).
- 18-Gauge Cordless or Pneumatic Brad Nailer with 1-1/4”, 1-3/4”, and 2” galvanized finish brads.
- 360-Degree Self-Leveling Green Cross-Line Laser Level mounted on an adjustable telescoping pole or tripod.
- 48” Magnetic Heavy-Duty Box Level (Stabila or Empire) for plumbing vertical stiles.
- Electronic Deep-Scan Stud Finder and 1.5” blue painter’s masking tape.
- Coping Saw with 15 TPI fine-tooth carbon steel blades for inside corner copes.
- Japanese Flush-Cut Pull Saw for undercutting door casings and jambs.
- Pro Caulking Gun (18:1 or 26:1 thrust ratio for smooth, fatigue-free dispensing).
Consumables & Professional Chemistry:
- Loctite Power Grab Express Heavy Duty polyurethane construction adhesive (budget 1 tube per 30–35 linear feet).
- DAP Dynaflex 230 paintable elastomeric acrylic caulk (2–3 tubes per standard 12×12 room).
- Crawford’s or DAP Platinum Patch sandable vinyl spackle.
- 220-Grit Foam Sanding Sponges for seamless flush sanding.
- Zinsser BIN or 1-2-3 Primer for sealing raw cut ends.
- Premium Waterborne Alkyd Enamel (Benjamin Moore ADVANCE or Sherwin-Williams Emerald Urethane Trim Enamel).
- UL-Listed Electrical Outlet Box Extenders (NEC electrical building code compliance).
Phase 2: Wall Preparation, Stud Mapping & 360° Laser Datum Line
Never assume that existing drywall walls are plumb, corners are 90 degrees, or floors are dead-level. Proper prep guarantees a rock-solid foundation:
- Remove Old Baseboards: Score the painted caulk seam along the top of your existing baseboards with a utility knife to prevent tearing drywall paper. Pry baseboards gently using a wide trim puller tool.
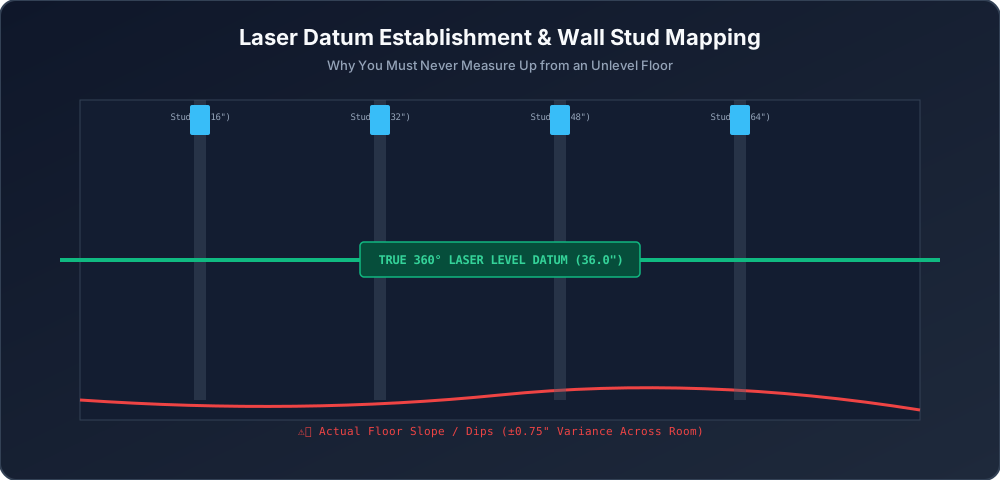
- Map Wall Studs with Blue Tape: Run an electronic stud finder horizontally across every wall to locate vertical 2×4 studs (typically on 16.0” on-center spacing). Apply vertical strips of blue painter’s tape near the ceiling above your work zone so stud locations remain clearly visible throughout the entire installation.
- Locate the Room’s High Floor Point: Position your 360-degree laser level in the center of the room. Measure vertically down to the floor at all four corners. The corner with the shortest measurement is your room’s highest floor point.
- Establish the Master Laser Datum: Measure your target wainscot height (e.g. 36.0 inches) up from the highest floor point and pencil a mark. Align your laser level directly to this mark. This green laser plane represents your true horizontal datum around all four walls.
Phase 3: Plinth Blocks & Door Casing Transitions
One of the biggest blunders made by amateur installers is running thick 3/4” wainscoting boards directly into thin 1/2” door casing trim, leaving an awkward, sharp overhang.
The Plinth Block Solution:
Where wainscot top rails, chair rails, or tall baseboards terminate into door frames, install plinth blocks at the bottom of the door casing:
- Choose a plinth block that is 1/4” to 3/8” thicker and 1/4” wider than your door casing (e.g., a 1” thick × 3.75” wide plinth block for standard 3.5” casing).
- Undercut the bottom of the existing door casing using a multi-tool or Japanese pull saw.
- Slide the plinth block underneath and secure it with 2” finish brads and construction adhesive.
- Your baseboard and wainscot rail now terminate flush against the proud face of the plinth block, creating an elegant historic transition.
Phase 4: Baseboards & Horizontal Top Rail Mounting
+-----------------------------------------------------------------+
| LASER LEVEL REFERENCE LINE (36.0" FINISHED HEIGHT DATUM)        |
| --------------------------------------------------------------- |
| TOP RAIL (1x4) <-- Zig-zag construction adhesive + 2" brads     |
| --------------------------------------------------------------- |
|      |                  |                  |                  | |
|   STILE 1            STILE 2            STILE 3            STILE 4|
|      |                  |                  |                  | |
| =============================================================== |
| BASEBOARD (1x6) <-- Nailed into wall studs at every 16" mark    |
| FINISHED FLOOR (0.0" BASE DATUM)                                |
+-----------------------------------------------------------------+- Install Baseboards: Position your 1×6 baseboards along the floor. Nail through the baseboard into wall studs using two 2” 18-gauge brads at every 16-inch stud mark. If the floor dips away from the laser line, scribe the baseboard bottom or cover floor gaps later with flexible quarter-round base shoe.
- Apply Construction Adhesive to Top Rail: Apply a continuous 1/4” zig-zag bead of Loctite Power Grab along the back of your 1×4 horizontal top rail.
- Anchor Top Rail to Laser Line: Press the top rail against the wall, aligning its top edge flush with the green laser datum line. Drive two 2” brad nails through the rail into every wall stud.
- Mount Chair Rail Cap Moulding: Apply a thin bead of wood glue to the upper edge of the 1×4 rail. Seat your decorative chair rail cap over top and pin down with 1-1/4” brad nails spaced every 12 inches.
Phase 5: Symmetrical Stile Layout & Continuous 0” Tape Marking
⚠️ The Golden Rule of Layout: Never measure stile intervals using repeated increments on a notepad! Shifting the tape across the wall creates compounded arithmetic drift. Always use a continuous 0-inch running tape schedule.
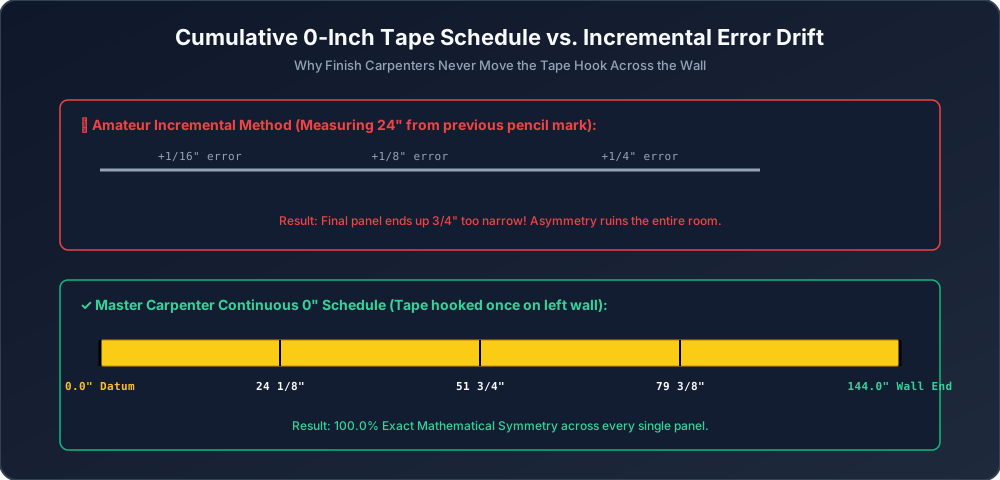
The Symmetrical Panel Width Formulas:
Net Wall Span = Total Wall Width - (2 × Corner Margin)
Total Stile Width = (Panel Count + 1) × Stile Width
Individual Panel Width = (Net Wall Span - Total Stile Width) / Panel Count
Marking Protocol:
- Run your wall dimensions through our Wainscoting Layout Calculator to generate your continuous tape schedule.
- Hook your tape measure at 0.0 inches on the far-left corner wall.
- Lock the tape in place across the wall.
- Transfer the calculator’s exact decimal/fractional marks directly onto the bottom of the top rail and the top of the baseboard for every single stile left-edge and right-edge.
Phase 6: Cutting, Plumb Checking & 45° Cross-Pin Nailing
- Measure Stile Heights Individually: Because ceilings and baseboards may have microscopic variances, measure the exact vertical gap between the top rail and baseboard at each stile location.
- Cut Stiles on Miter Saw: Make clean 90-degree square cuts using an 80-tooth carbide blade.
- Apply Adhesive: Apply an “S-wave” bead of Loctite Power Grab down the back face of each stile.
- Plumb and Nail (The 45° Cross-Pin Lock):
- Align the stile with your pencil tape marks.
- Hold a 48” box level against the stile edge to ensure absolute vertical plumb.
- Drive three pairs of 18-gauge brad nails (top, middle, bottom).
- The Pro Nailing Angle: Angle the first nail at 45 degrees to the left and the second nail at 45 degrees to the right. This opposing-angle cross-pinning locks the wood tightly into the drywall gypsum, preventing it from pulling loose while the polyurethane glue cures.
Phase 7: Precision Corner Joinery: Coped Inside Corners & 45.5° Outside Miters
Drywall corners are almost never true 90-degree right angles due to taped drywall compound buildup. Finish carpenters use specialized joinery techniques:
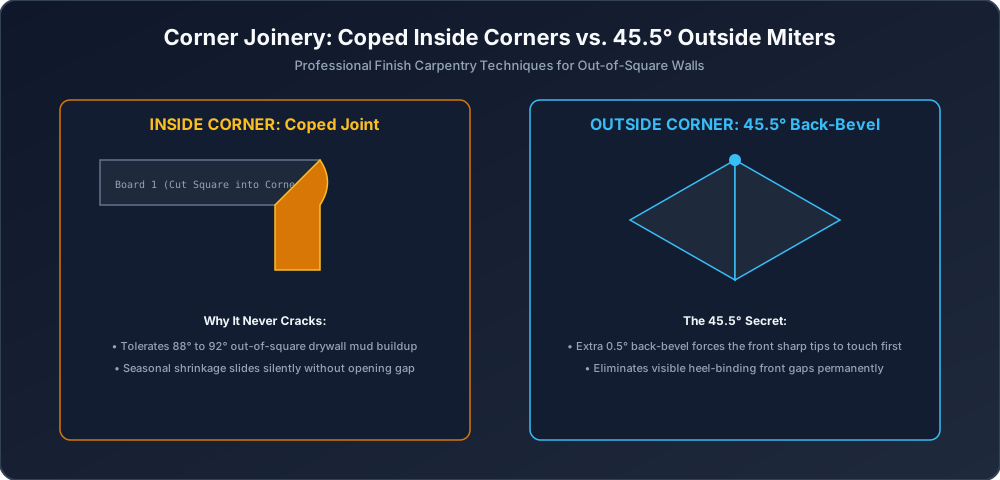
1. Inside Corners: The Coped Joint
Never miter inside corners! A 45-degree inside miter will open up and crack as the building shifts.
- Step A: Run the first horizontal rail and chair rail square into the corner wall.
- Step B: Cut the intersecting board on your miter saw at a 45-degree inside miter to expose the profile edge.
- Step C: Using a handheld coping saw, cut along the exposed pencil line while back-beveling the saw blade at a 5-degree undercut angle.
- Step D: Test fit the coped piece over the square board. It will nest tightly over the profile, creating an indestructible joint that never cracks open.
2. Outside Corners: The 45.5° Back-Bevel Miter
When trimming around an outside corner (such as a chimney bump-out or hallway turn):
- Set your miter saw to 45.5 degrees (half a degree beyond 45°).
- The slight back-bevel forces the sharp front exterior points to meet first with zero gap, absorbing any out-of-square wall irregularities. Apply wood glue to the miter faces and pin together with 1-1/4” brads.
Phase 8: Spackling, 220g Sanding & Two-Coat Alkyd Enamel Finishing
Flawless millwork is 30% carpentry and 70% prep work. Follow the 4-step finishing protocol:
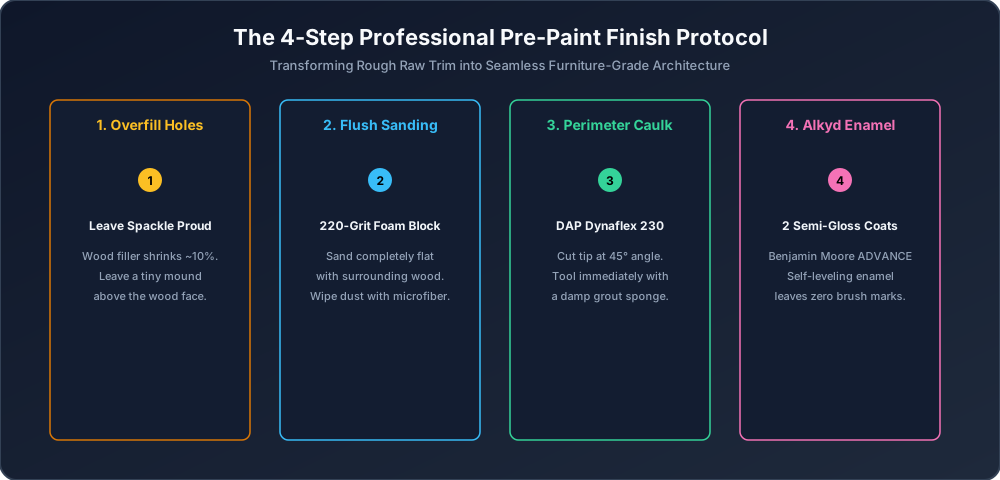
- Leave Spackle Proud: Fill all brad nail holes with sandable vinyl spackle. Spackle shrinks ~10% as its water evaporates. Leave a slight dome of filler proud of the wood surface rather than scraping it flat.
- Flush Sanding (220-Grit): Allow spackle to dry for 60 minutes. Using a 220-grit foam sanding block, sand each hole completely flat with the surrounding wood face. Vacuum all dust and wipe down with a microfiber tack cloth.
- Elastomeric Caulking: Cut the tip of your DAP Dynaflex 230 caulk tube at a 45-degree angle to produce a tiny 1/8” bead. Apply caulk along all seams where stiles, rails, and baseboards meet drywall. Immediately tool the bead smooth with a damp grout sponge.
- Two Finish Enamel Coats:
- Spot-prime sanded nail holes and cut end-grain with Zinsser primer to eliminate dull spots (“flashing”).
- Using a 2-1/2” angled sash brush for cutting-in and a 3/8” microfiber mini roller for flat faces, apply two coats of premium waterborne alkyd enamel (Benjamin Moore ADVANCE or Sherwin-Williams Emerald Urethane).
- Waterborne alkyd enamel self-levels as it dries, leaving a glass-smooth, brush-mark-free finish that resists kicks, scuffs, and fingerprints.
National Electrical Code (NEC) Compliance: Outlet Box Extenders
When 3/4” wainscoting boards are installed around electrical outlets, the recessed metal or plastic electrical box sits dangerously deep behind combustible wood trim.
⚡ NEC Section 314.20 Warning: In walls of concrete, tile, wood, or other combustible material, electrical boxes must sit flush with the finished surface.
How to Comply in 5 Minutes:
- Turn off power to the circuit at the main breaker panel.
- Unscrew the outlet receptacle from the wall box.
- Slide a UL-listed plastic box extender (such as an Arlington BE1 or Carlon B1EXT) over the receptacle into the box.
- Re-fasten with longer 6-32 machine screws so the metal receptacle ears sit firmly on the finished surface of the wainscot trim. Re-install the faceplate.
Master Carpenter FAQ: Wainscoting Installation
Q1: Do I need to glue wainscoting to the wall, or are nails enough?
You must use both construction adhesive and finish nails. Finish brad nails act as temporary clamps while the polyurethane adhesive cures. Relying on nails alone into drywall allows boards to loosen and rattle over time.
Q2: What blade should I use on my miter saw?
Always use an 80-tooth carbide fine-finish crosscut blade on a 10” or 12” miter saw. Coarse 24-tooth framing blades will splinter and tear pre-primed MDF and poplar edges.
Q3: How do I handle bowed or wavy drywall studs?
If a wall stud is bowed outward, creating a bump, use a hand planer or coarse sanding block on the back of the trim board to relieve the thickness. If a stud is dished inward, slide a wooden shim behind the rail before nailing and fill the back edge with caulk.
Start Your Project with Exact Mathematics
- Wainscoting Layout Calculator — Generate scaled 2D wall elevations and cumulative 0-inch tape schedules.
- Wainscoting Material Calculator — Optimize standard 8ft and 12ft lumber counts.
- Wainscoting Cost Calculator — Itemize fasteners, adhesives, and paint budgets.