Walk into any historic European manor, 19th-century brownstone, or modern custom estate, and you will immediately notice the dignified architectural presence of wainscoting. But what exactly is wainscoting, where did it originate, and why has it remained one of the most enduring and desirable interior millwork features for over six centuries?
In this comprehensive guide written from a master finish carpenter’s workbench, we break down the 600-year history of wainscot paneling, its thermal and structural engineering origins, the exact anatomy of its five core components, and how modern homeowners can use it to elevate ceiling heights, protect walls, and add substantial resale value.
1. The 14th-Century Origins of “Wagenschot”
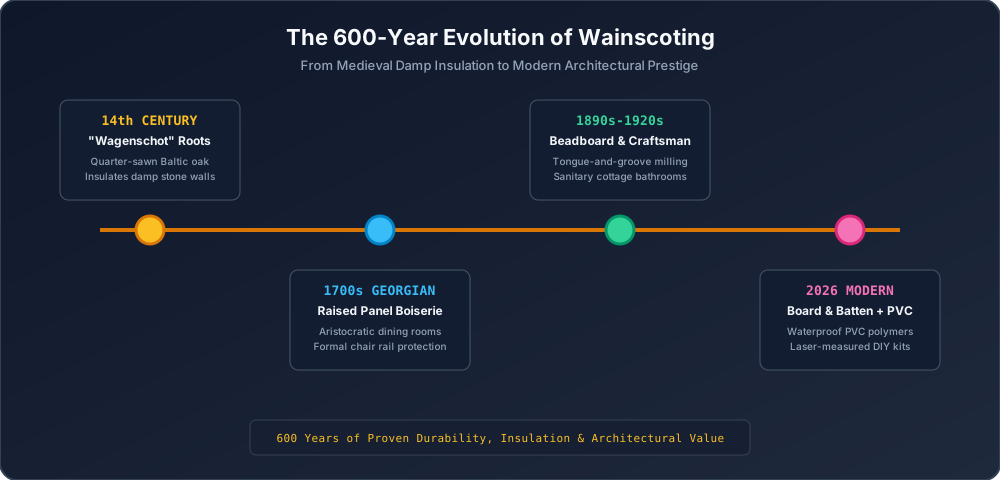
The word wainscoting traces its etymology back to the 14th-century Middle Low German term “wagenschot” (and the Middle Dutch waghenscote).
The word is a compound of:
- Wagen / Waghen: A four-wheeled horse-drawn carriage or heavy transport wagon.
- Schot / Scote: A wooden partition, board, or bulkhead panel.
Originally, the term did not describe wall paneling at all. Instead, it referred specifically to premium, knot-free, quarter-sawn Baltic oak timber harvested from ancient old-growth forests in Prussia, Poland, and Livonia (modern-day Estonia and Latvia). Because quarter-sawn Baltic oak possessed exceptional dimensional stability, tight vertical grain rings, and immunity to seasonal warping, it was imported by shipwrights to construct royal carriages (wagens), ship bulkheads, and beer casks.
The Functional Engineering Purpose: Thermal Barrier & Rising Damp Protection
In medieval European stone castles and Elizabethan manor homes, exterior walls were constructed from thick, uninsulated stone or solid masonry. During damp, freezing winters, porous stone absorbed ground water through capillary action—a phenomenon known in masonry as rising damp.
This created freezing, clammy interior drafts, condensation, and ruined tapestries. Wood craftsmen solved this architectural defect by installing oak wainscot boards across the lower third of cold masonry walls.
This wood cladding served three vital engineering functions:
- Dead-Air Thermal Insulation: The wood boards created an insulating air gap between the cold stone and the room’s living perimeter, dramatically improving interior thermal retention.
- Moisture & Saltpeter Shield: It prevented rising damp and efflorescence salts from migrating into interior living spaces.
- Draft Exclusion: Tongue-and-groove jointing sealed floor-to-wall gaps where cold winter air pooled along flagstone floors.
Over the centuries, as residential construction transitioned from cold stone to insulated plaster and modern timber framing, the functional insulation necessity subsided, while the aesthetic prestige and wall armor protection of wainscoting became permanent fixtures of high-end classical architecture.
2. The 5 Core Components of Wainscoting Anatomy
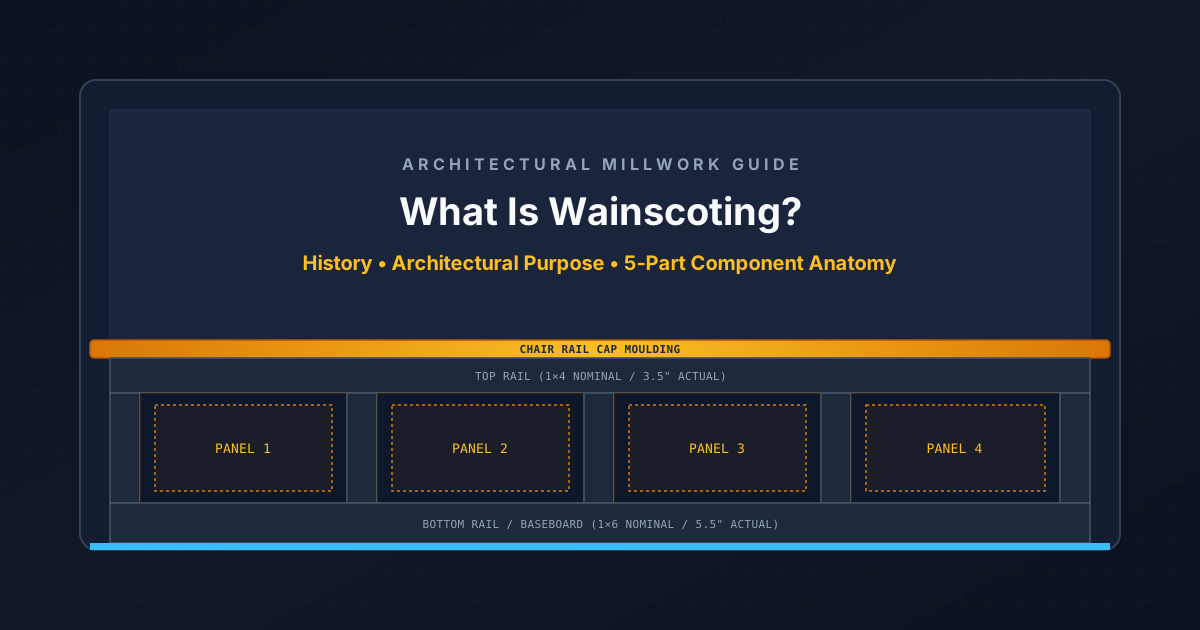
To design, measure, or build wainscoting correctly, you must master the specialized finish carpentry terminology. Every traditional wainscoting installation is assembled from five distinct architectural millwork profiles:
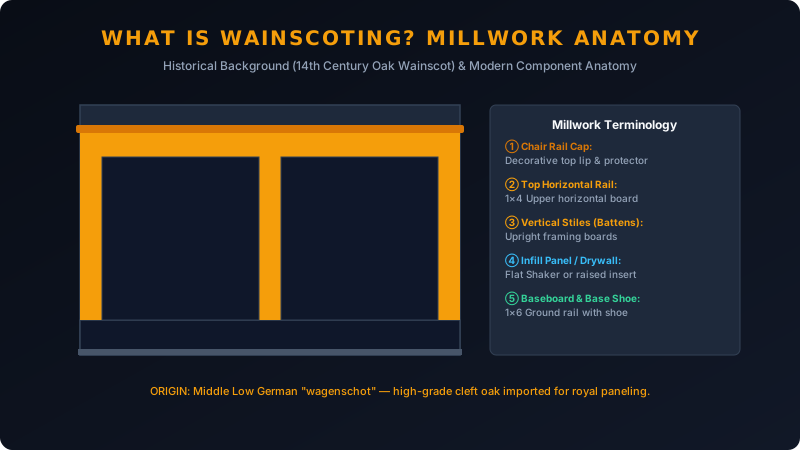
[1] CHAIR RAIL / CAP MOULDING (Top decorative lip & wall armor)
-----------------------------------------------------------------
[2] TOP HORIZONTAL RAIL (1x4 upper framing board / 3.5" actual)
-----------------------------------------------------------------
  | [3] VERTICAL |       [4] INFILL PANEL FACE        | [3] VERTICAL |
  |    STILE     |     (Recessed Drywall / MDF)       |    STILE     |
  | (1x4 board)  |                                    | (1x4 board)  |
-----------------------------------------------------------------
[5] BOTTOM BASEBOARD & BASE SHOE (Ground-level structural plate)
=================================================================
FINISHED FLOOR (0.0" LEVEL BASE DATUM)
Component Breakdown & Technical Specifications:
| Component Name | Standard Nominal Lumber | Actual Finished Dimension | Architectural Function |
|---|---|---|---|
| 1. Chair Rail / Cap Moulding | 1×2 or Custom Cap | 1.25” × 0.75” to 2.25” | The crowning trim profile with a decorative bullnose or bevel. Protects drywall from furniture backs and provides a finished upper ledge. |
| 2. Top Horizontal Rail | 1×4 Board | 3.50” wide × 0.75” thick | The continuous upper horizontal framing spine that ties all vertical stiles together and creates the upper panel perimeter. |
| 3. Vertical Stiles | 1×3 or 1×4 Board | 2.50” or 3.50” wide × 0.75” | The upright framing members spaced evenly across the wall span to divide the wainscot into symmetrical rectangular boxes. |
| 4. Infill Panel Face | 1/4” MDF or Drywall | 0.25” to 0.50” thickness | The center recessed field inside each framed rectangle. In budget DIY work, painted drywall serves as the infill; in formal millwork, a beveled wood or MDF panel is inserted. |
| 5. Bottom Baseboard & Shoe | 1×6 or 1×8 + Base Shoe | 5.50” to 7.25” + 0.5” shoe | The structural ground plate that anchors the stiles to the floor, conceals the drywall-to-flooring expansion gap, and resists shoe kicks. |
3. Wainscoting vs. Full Wall Paneling vs. Shiplap
One of the most common points of confusion for homeowners is distinguishing wainscoting from other popular wall treatments. Here is how they compare in scope, height, and framing style:
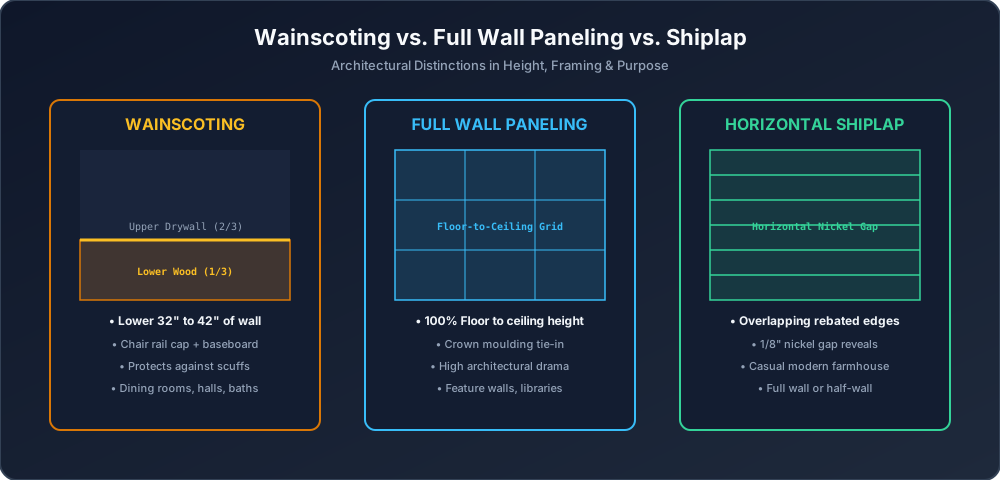
1. Wainscoting (Lower 1/3 to 2/3 Height)
Wainscoting is defined by its partial wall coverage. It terminates below the ceiling (typically between 32” and 64” from the floor), always features a distinct chair rail cap, and separates the wall into two contrasting visual zones (e.g. crisp painted millwork below with bold wallpaper or saturated paint above).
2. Full Wall Paneling / Floor-to-Ceiling Boiserie (100% Height)
Full wall paneling spans from the finished baseboard all the way up to the crown moulding at the ceiling. It transforms the entire wall into an architectural grid. While stunning in executive studies, historic libraries, and two-story entry foyers, full-height paneling is 3x to 5x more expensive to install than wainscoting.
3. Shiplap & Tongue-and-Groove Planking
Shiplap consists of horizontally or vertically stacked wooden boards with overlapping rebated joints (known as nickel gap reveals). While shiplap can be installed at wainscot height, traditional wainscoting utilizes structural post-and-beam stile-and-rail framing, whereas shiplap is a continuous directional planking surface.
4. The 4 Big Practical Benefits for Modern Homes
While modern homes have central heating and moisture-resistant insulation, wainscoting remains one of the highest-ROI interior upgrades for four compelling reasons:
1. Unbeatable Wall Armor & Scuff Protection
Standard residential drywall is made from soft gypsum plaster wrapped in paper. In high-traffic zones—dining rooms with shifting chairs, mudrooms with backpacks, hallways with vacuum cleaners, and entryways with pets—drywall suffers constant dings, scratches, and punctures. Solid wood or MDF wainscoting acts as a rigid, impact-resistant armor shield that repels daily household abuse.
2. Optical Ceiling Elevation & Classical Proportion
Installing wainscoting according to the Rule of Thirds (e.g., a 36” chair rail on an 8ft wall) visually stretches the upper wall expanse. The strong vertical lines of the stiles guide the human eye upward, creating the psychological perception of higher ceilings and expansive room volume.
3. Acoustic Dampening & Echo Reduction
Large open-concept living rooms, dining halls, and high-ceiling foyers frequently suffer from harsh acoustic flutter echo. The alternating depths of stiles, rails, and recessed panel faces scatter and diffuse sound waves, significantly improving speech clarity and creating a warmer, quieter acoustic environment.
4. High Resale Appeal & Appraised Value
Real estate appraisers and buyers instinctively associate custom architectural millwork with premium craftsmanship. A professionally trimmed dining room or foyer signals that a home was built with bespoke care rather than builder-grade shortcuts, frequently returning 70% to 90% of its installation cost at resale.
5. Substrate Selection: Choosing the Right Material
Selecting the correct wood or engineered substrate is crucial for ensuring your wainscoting never warps, cracks, or swells over decades of seasonal humidity changes:

A. Pre-Primed MDF (Medium-Density Fiberboard)
- Cost: $0.85 – $1.40 per linear foot ($2.50 – $4.50 / sq ft).
- Pros: Completely knot-free, perfectly flat, ultra-smooth, zero wood grain bleed, and budget-friendly.
- Cons: Absorbs standing water like a sponge; will swell permanently if flooded.
- Best Use: Living rooms, formal dining rooms, master bedrooms, and dry hallways.
B. Solid Clear Poplar (Hardwood)
- Cost: $1.75 – $2.60 per linear foot ($4.50 – $7.50 / sq ft).
- Pros: Real solid hardwood with crisp routered edges, high dent resistance, and tight grain. The finish carpenter’s #1 paint-grade wood.
- Cons: Moderately higher material cost than MDF; requires checking for natural green mineral streaks before staining.
- Best Use: High-traffic mudrooms, staircases, family rooms, and pet areas.
C. Cellular Extruded PVC (Synthetic Polymer)
- Cost: $2.10 – $3.20 per linear foot ($6.00 – $10.00 / sq ft).
- Pros: 100% Waterproof, impervious to steam, mold, and rot. Can be washed with direct water spray.
- Cons: Expands and contracts longitudinally with temperature swings; requires polyurethane or PVC adhesive.
- Best Use: Full bathrooms, shower perimeters, laundry rooms, and basements.
D. Stain-Grade Hardwoods (White Oak, Walnut, Cherry)
- Cost: $3.80 – $6.50+ per linear foot ($12.00 – $22.00 / sq ft).
- Pros: Breathtaking natural cathedral grain patterns, heirloom durability, and luxurious historic appeal.
- Cons: Requires advanced joinery skills, grain-matching, and multi-stage furniture finishing.
- Best Use: Executive studies, wine cellars, historic estates, and custom libraries.
6. Pro Layout Rules: Avoiding Amateur Mistakes
Before cutting your first piece of wood, keep these three master carpenter layout rules in mind:
📐 Rule #1: The Symmetrical N+1 Stile Law
If you have $N$ rectangular panels across a wall, you will always have $N + 1$ vertical stiles. To ensure perfect symmetry, both the far-left corner stile and far-right corner stile must be identical in width.
📏 Rule #2: The Continuous 0” Datum Schedule
Never measure panel widths with individual incremental marks on a notepad. Shifting your tape measure across the wall creates compounded arithmetic drift. Always hook your tape at 0.0 inches on the left wall corner and mark all stile edges continuously across.
⚡ Rule #3: Electrical Box Margin Clearance
Ensure your vertical stiles never bisect a duplex electrical outlet or light switch. Maintain a minimum clearance of 2.0 inches between the edge of any stile and an electrical faceplate.
7. Master Carpenter FAQ: What Is Wainscoting?
Q1: What is the difference between wainscoting and a chair rail?
A chair rail is a single horizontal strip of moulding installed at chair height (~36” from the floor) to protect walls. Wainscoting is the complete assembly of trim, including the chair rail cap, horizontal top rail, vertical stiles, infill panels, and bottom baseboard.
Q2: How high should wainscoting be installed?
According to the classical Rule of Thirds, wainscoting should cover either the lower 1/3 (32”–36” on an 8ft ceiling) or the lower 2/3 (60”–64” on an 8ft ceiling). Avoid dividing the wall at exactly 50% (48”), which makes the ceiling feel oppressively low.
Q3: Can wainscoting be installed over existing textured drywall?
Yes! For light texture (orange peel), applying two coats of heavy-bodied semi-gloss trim enamel often conceals the texture adequately. For heavy knockdown or popcorn textures, finish carpenters install 1/4” smooth hardboard or MDF skin panels behind the stiles before painting.
Q4: Does wainscoting make small rooms look bigger or smaller?
When proportioned properly at the lower third (32”–36”), wainscoting makes small rooms feel significantly larger and taller. The strong vertical lines of the stiles draw the gaze upward toward the ceiling, while the two-tone color contrast adds depth.
Ready to Calculate Your Room’s Layout?
Don’t risk costly lumber waste or uneven panel math. Use our free interactive tool suite:
- Wainscoting Layout Calculator — Generate scaled 2D wall elevations, continuous 0-inch tape schedules, and full cut lists.
- Wainscoting Height Calculator — Calculate harmonious proportions based on your exact ceiling height.
- Wainscoting Cost Calculator — Estimate material, fastener, adhesive, and contractor costs in seconds.