One of the most critical and irreversible decisions in finish carpentry is determining the finished height of your wainscoting. Install your chair rail cap even two inches too high or too low, and the entire room will feel visually clumsy, top-heavy, or claustrophobic.
In classical architectural theory and professional interior millwork, the secret to timeless visual harmony is rooted in the Rule of Thirds and the Golden Ratio (Phi ≈ 1.618): your wainscoting should terminate either at the lower 1/3 (Dado height) or the lower 2/3 (Craftsman height) of your total ceiling expanse.
In this master architectural height manual, we explore the optical physics behind ceiling proportions, provide exact measurement formulas for 8ft, 9ft, 10ft, and 12ft walls, analyze room-by-room furniture clearances, and show how to seamlessly resolve window sill and electrical switch collisions.
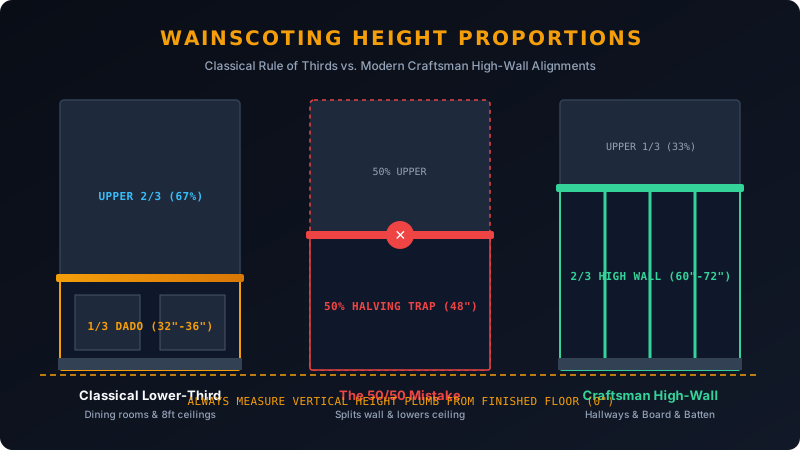
1. The Architectural Mathematics: Rule of Thirds vs. The 50/50 Halving Pitfall
Why does the Rule of Thirds govern interior wall design? Human visual perception naturally seeks dynamic balance rather than static symmetry when looking at vertical planes.
The Dangerous “Halving Pitfall” (Why 50/50 Ruins a Room)
The single most common mistake made by DIYers and inexperienced carpenters is installing wainscoting at exactly half the wall height (such as 48 inches on a standard 8-foot / 96-inch ceiling).
Dividing an interior wall into two equal 50% halves triggers an optical flaw known in visual ergonomics as static competition:
- The Bisecting Horizon: A horizontal line running at eye level (48” to 54”) creates a harsh visual horizon that divides the room into two competing upper and lower rectangles.
- Ceiling Compression: Instead of drawing the eye upward toward the crown moulding, the gaze bounces back and forth across the center bisecting seam. This creates the optical illusion of a heavy, sagging ceiling that feels 6 to 12 inches lower than it actually is.
- Switch & Outlet Collisions: Standard residential light switches are centered at 48 inches from the subfloor. A 48-inch wainscot rail runs directly through the center of every switch plate in the room, creating an unsightly caulking nightmare.
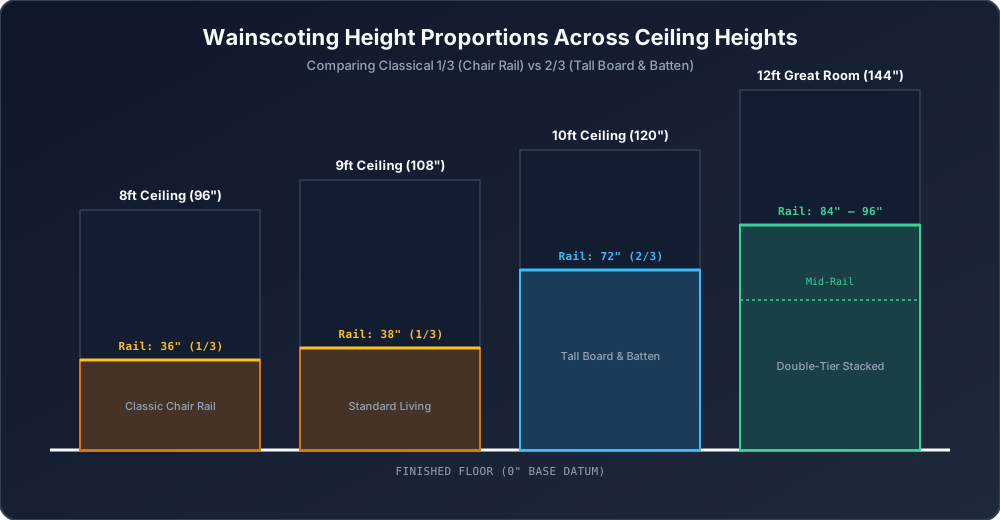
Master Proportion Comparison Table:
| Proportion Strategy | Ratio Formula | 8-Foot Ceiling (96”) | 9-Foot Ceiling (108”) | 10-Foot Ceiling (120”) | 12-Foot Great Room (144”) | Psychological Visual Effect |
|---|---|---|---|---|---|---|
| Classic Lower Third (Dado) | Ceiling × 0.333 | 32.0” – 36.0” | 36.0” – 38.0” | 40.0” – 44.0” | 48.0” – 52.0” | Grounded, timeless, anchors furniture, elevates ceiling |
| The 50/50 Halving Pitfall (AVOID) | Ceiling × 0.500 | 48.0” | 54.0” | 60.0” | 72.0” | Static, bisects light switches, lowers perceived ceiling |
| Golden Ratio Section (Phi) | Ceiling / 1.618 | 59.3” | 66.7” | 74.2” | 89.0” | Museum gallery, imposing, bespoke, aristocratic |
| Upper Two-Thirds (Craftsman) | Ceiling × 0.667 | 64.0” | 72.0” | 80.0” | 96.0” | Dramatic vertical grandeur, modern farmhouse, cozy |
2. Room-by-Room Functional Height Standards
Wainscoting does not exist in an empty architectural museum—it must interact gracefully with dining room chairs, bathroom vanity backsplashes, door casing trim, and electrical receptacles.
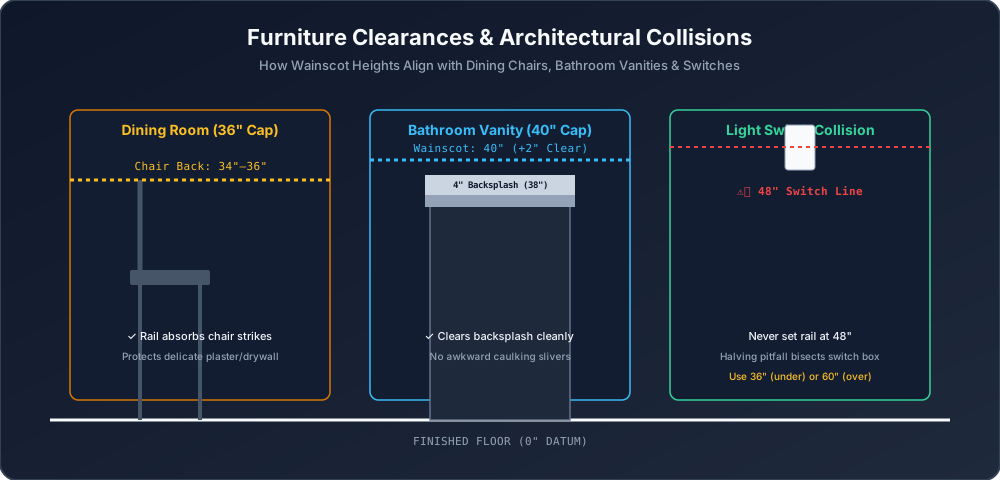
A. Formal Dining Rooms: 34” to 36” Chair Rail Height
The term “chair rail” originated for a purely functional reason: dining chairs pushed back from tables constantly dented and chipped soft lime plaster walls.
- Standard Dining Chair Height: Dining chair backs stand between 34 and 36 inches tall.
- Master Carpenter Recommendation: Install your horizontal top rail cap at exactly 36.0 inches off the finished floor. This guarantees that the upper wooden rail absorbs the impact of shifting chairs while keeping the lower panel boxes grounded and proportionate with dining table surfaces (typically 30” high).
B. Bathrooms & Powder Rooms: 38” to 42” Vanity Alignment
Bathrooms present unique horizontal plane challenges due to plumbing fixtures and vanity countertops.
- Countertop Height: Modern comfort-height vanities stand at 36.0 inches.
- Tile / Quartz Backsplash: Standard backsplashes add 3.0 to 4.0 inches (reaching 39”–40” total height).
- Master Carpenter Recommendation: If you install wainscoting at standard 36” dining height, your chair rail cap will crash awkwardly into the side of the vanity backsplash. In powder rooms and full baths, set your wainscoting at 40.0 to 42.0 inches. This allows the chair rail to float cleanly 1 to 2 inches above the backsplash, eliminating difficult-to-caulk horizontal slivers.
- Material Tip: Always specify Cellular Extruded PVC moulding in bathrooms with showers to guarantee 100% waterproof protection against steam swelling.
C. Entry Foyers, Mudrooms & Hallways: 60” to 72” High-Wall Board & Batten
Narrow transitional spaces like hallways and mudrooms benefit dramatically from Two-Thirds High-Wall Paneling.
- Visual Impact: Running vertical battens up to 60” or 64” on an 8ft wall (or 72” on a 9ft wall) creates a soaring vertical rhythm that transforms cramped corridors into expansive estate hallways.
- Mudroom Functionality: At 60” to 64”, the sturdy 1×4 top rail and 1×2 display shelf provide a solid structural mounting plate for heavy cast-iron coat hooks, backpack pegs, and seasonal display art.
D. Master Bedrooms: 54” to 60” Integrated Headboard Height
In master bedroom feature walls, tall wainscoting installed behind the bed functions as an integrated architectural headboard.
- Headboard Alignment: Standard mattress sets on frames sit 25” to 30” high.
- Master Carpenter Recommendation: Running wainscoting up to 54.0 to 60.0 inches frames pillows and nightstands gracefully. Painting the wainscoting in deep charcoal, rich navy, or forest green while keeping the upper wall warm white creates an intimate, bespoke bedroom retreat.
3. Window Sill & Casing Transitions: Two Master Carpenter Solutions
What should you do when your calculated chair rail height intersects a window sill? Finish carpenters resolve this with two standard protocols:
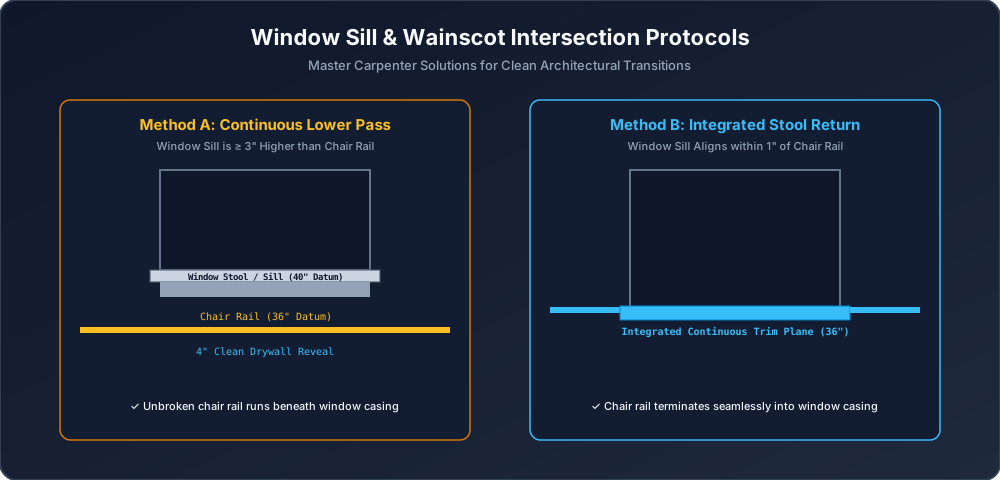
Method 1: The Continuous Lower Apron Pass (Window Sill is ≥ 3” Higher)
If your window sill stands at 40” and your calculated chair rail is 36”, do not jog the chair rail up! Run the continuous chair rail straight across the wall underneath the window. Maintain an unbroken 4-inch drywall reveal between the top of the chair rail cap and the bottom of the window apron moulding. This preserves the horizontal unity of the room.
Method 2: The Integrated Stool Return (Window Sill Aligns within 1”)
If your window sill sits at approximately the same height as your target chair rail (e.g. 35.5” to 36.5”), terminate the chair rail directly into the window casing side trim. Mill the window stool (the interior window ledge) to match the projection depth of your chair rail cap, creating an unbroken, custom architectural wraparound.
4. Two-Tier Double-Row Wainscoting for 10ft & 12ft Ceilings
When trimming rooms with 10-foot, 12-foot, or vaulted two-story ceilings, a single 36-inch row of wainscoting looks undersized and lost. For tall walls, master carpenters build Two-Tier Double-Row Wainscoting.
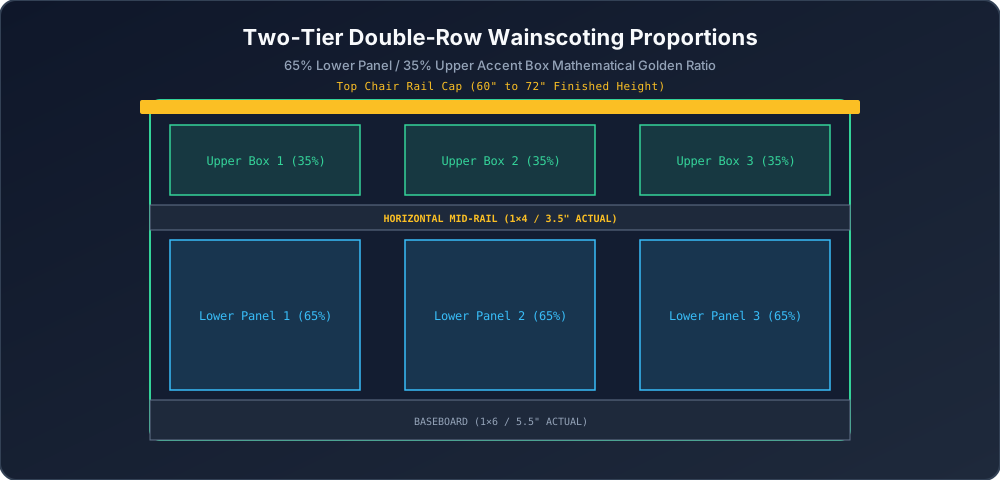
The 65 / 35 Mathematical Golden Proportion
To design a stacked two-tier wall without it looking chaotic, divide the infill area using the 65/35 Golden Rule:
- Overall Wainscot Height: Set the top chair rail at 66” to 72” (on a 10ft ceiling) or 84” to 96” (on a 12ft ceiling).
- Horizontal Mid-Rail: Install a continuous 1×4 horizontal mid-rail to split the height into two rows.
- Lower Tier (65% of infill height): Taller vertical rectangular panels that ground the wall.
- Upper Tier (35% of infill height): Smaller horizontal or square accent boxes that crown the installation.
+-------------------------------------------------------------+
| TOP CHAIR RAIL CAP (72.0" FINISHED HEIGHT)                  |
| ----------------------------------------------------------- |
| | UPPER ACCENT BOX (35%) | | UPPER ACCENT BOX (35%) |       |
| ----------------------------------------------------------- |
| HORIZONTAL MID-RAIL (1x4 / 3.5" ACTUAL)                     |
| ----------------------------------------------------------- |
| |                        | |                        |       |
| | LOWER TALL PANEL (65%) | | LOWER TALL PANEL (65%) |       |
| |                        | |                        |       |
| =========================================================== |
| BASEBOARD (1x8 / 7.25" GROUND PLATE)                        |
| FINISHED FLOOR (0.0" BASE DATUM)                            |
+-------------------------------------------------------------+
5. How to Establish a Laser Datum Line on an Unlevel Floor
In real-world construction, floors are never dead level. An 8-foot ceiling may measure 96.0” in one corner and 95.25” in another.
⚠️ The Golden Installation Rule: Never measure up from the floor with a tape measure at individual points along the wall! If your floor dips or slopes, your chair rail will follow the wave, creating a crooked, amateur installation.
Step-by-Step Laser Datum Protocol:
- Find the High Point of the Floor: Use a 360-degree green cross-line laser to shoot a level line around the entire perimeter of the room. Measure down from the laser line to the floor at every corner to identify the room’s highest floor point.
- Establish the Top Rail Datum: Measure your target wainscot height (e.g., 36.0 inches) up from the highest floor point. Align your laser level directly to this pencil mark.
- Lock the Laser Plane: Project the green laser line across all four walls. This line represents your true, gravitationally level reference datum.
- Scribe Baseboards to Match Floor Dips: Install your horizontal top rail and chair rail dead-level to the laser line. Any gaps caused by floor dips should be absorbed at the bottom baseboard by scribing or installing flexible base shoe moulding along the floor.
6. Master Carpenter FAQ: Wainscoting Height
Q1: Can I install 48-inch wainscoting on an 8-foot ceiling?
We strongly advise against 48-inch wainscoting on an 8-foot ceiling. Dividing the wall into two equal 50% halves (48” lower / 48” upper) creates visual competition that makes the ceiling feel lower and bisects standard 48” light switch boxes. Choose either 36” (Lower 1/3) or 64” (Upper 2/3) instead.
Q2: How high should wainscoting go up a staircase?
On an angled stairway wall, wainscoting height is measured plumb (vertically) from the front edge (tread nose) of the stair tread to the top of the angled chair rail. The contractor standard is 36.0 inches plumb, which matches the standard building code handrail height (34” to 38”).
Q3: What is the standard chair rail height for a 9-foot ceiling?
For a 9-foot (108”) ceiling:
- Classic Lower 1/3: Set chair rail at 36” to 38”.
- Tall Craftsman 2/3: Set high board & batten rail at 72”.
Q4: How do I handle tall baseboards with wainscoting?
If you have tall 7.25” baseboards, your vertical stile length is calculated with this simple formula:
Stile Height = Finished Wainscot Height - Baseboard Height - Top Rail Height - Cap HeightOur interactive Wainscoting Calculator automatically computes exact stile lengths based on your custom baseboard thickness.
Calculate Your Exact Room Dimensions Now
- Wainscoting Height Calculator — Test custom ceiling heights from 7ft to 14ft with live furniture clearances.
- Wainscoting Layout Calculator — Generate scaled 2D wall elevations and cumulative 0-inch tape marking schedules.
- Board and Batten Calculator — Calculate batten spacing for tall two-thirds high-wall installations.